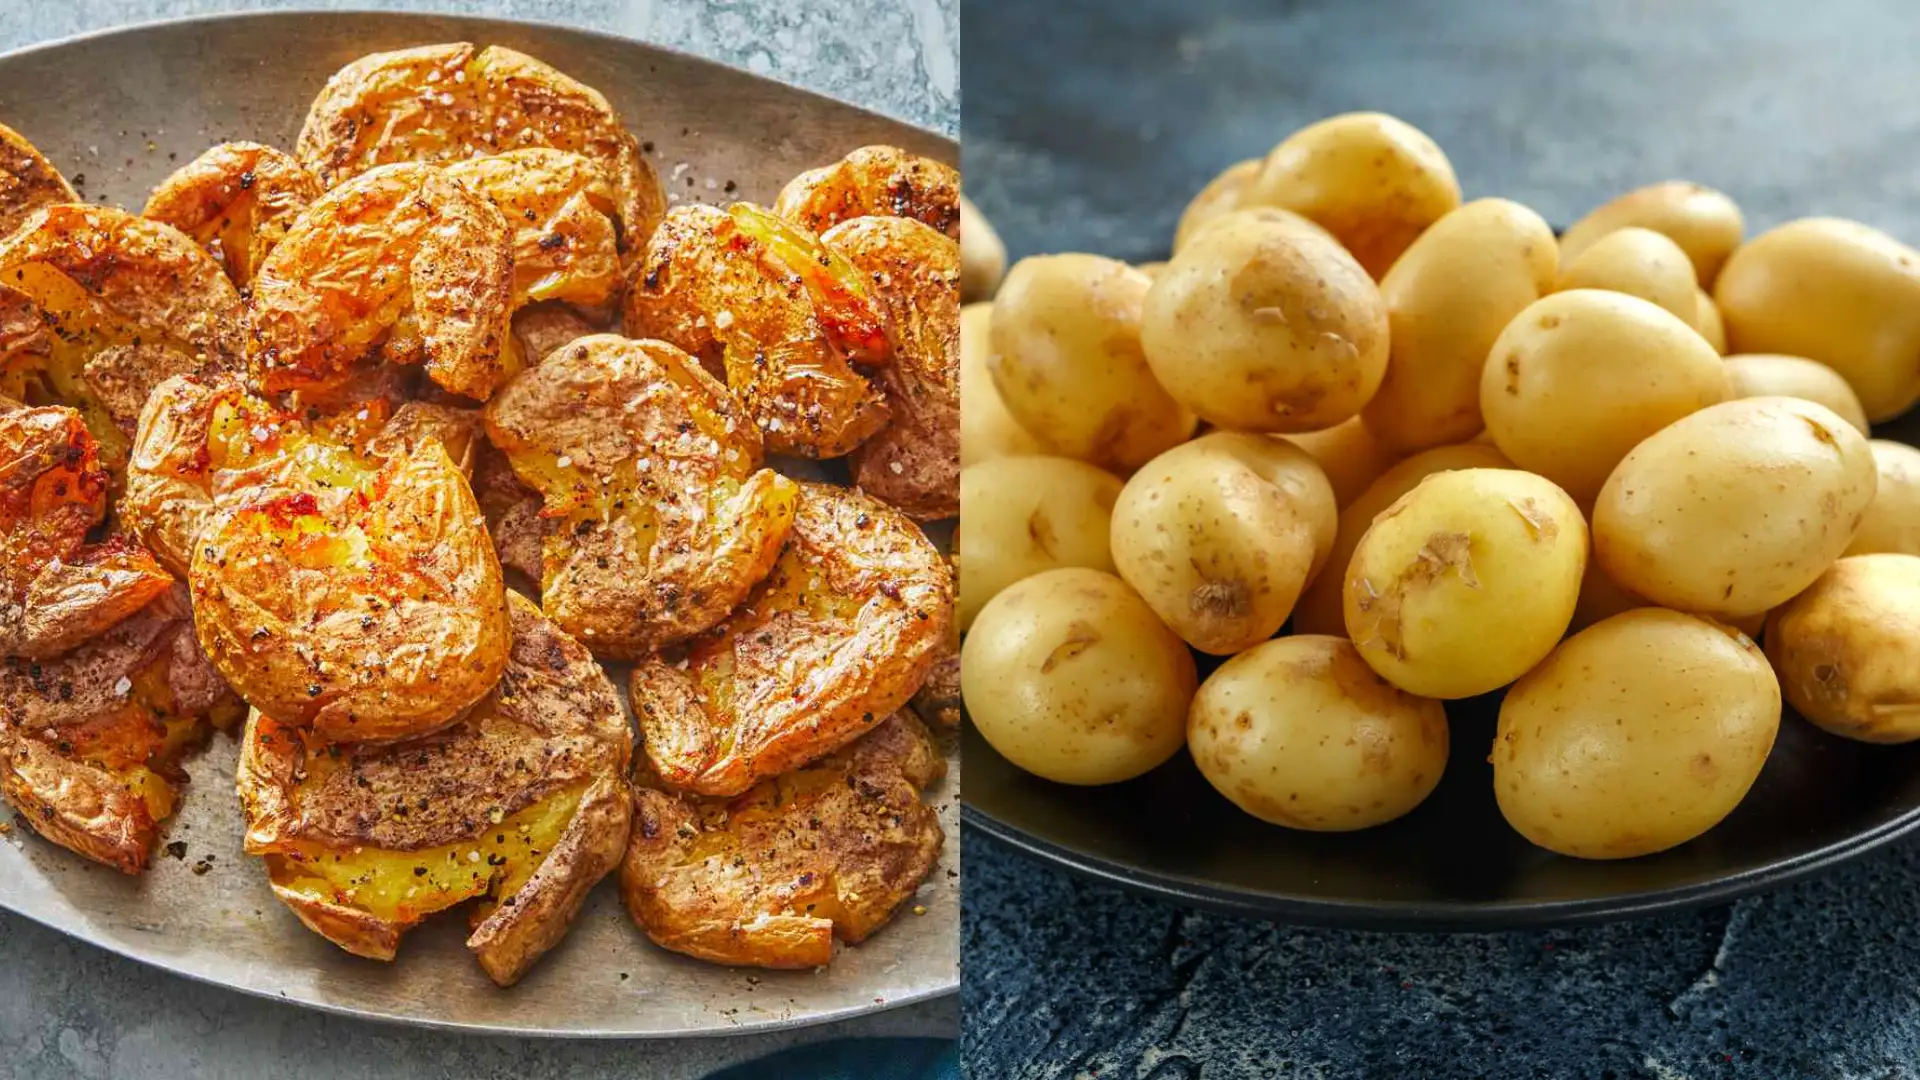
A perfectly smashed Yukon gold potato is crispy on the outside, fluffy on the inside, and buttery throughout.
Once you try it, regular roasted potatoes won’t compare.
You just need the right potato, the right technique, and a little patience.
Yukon Golds are the secret. Their naturally creamy, thin-skinned flesh makes them ideal for smashing; they crisp up beautifully on the outside while staying soft inside.
This blog gathers everything: boiling, smashing, roasting, and all the small details that make the difference.
What Makes Crispy Smashed Yukon Gold Potatoes a Must-Try
Yukon Golds aren’t just any potato.
Their thin skin crisps up without turning tough, and that naturally buttery flesh holds together beautifully under pressure, literally. When you smash them flat, you create more surface area.
More surface area means more contact with the hot pan, resulting in a deeper, golden crust you’re after.
Yukons balance waxy and starchy, giving crispy edges and a soft, creamy center every time.
Simple ingredients, one reliable technique. The results are worth it.
Ingredients and Kitchen Tools Needed
Here’s everything you’ll want to have ready before you start, nothing fancy, just the right basics.
| Ingredients | Amount | Kitchen Tools | Purpose |
|---|---|---|---|
| Yukon Gold potatoes | 1.5 lbs (about 700g) | Large pot | For boiling the potatoes |
| Olive oil | 3 tablespoons | Baking sheet | For roasting |
| Garlic powder | ½ teaspoon | Parchment paper | Prevents sticking |
| Sea salt | To taste | Flat-bottomed glass or mug | For smashing |
| Black pepper | To taste | Pastry brush | For applying oil evenly |
| Fresh rosemary or thyme | A few sprigs | Tongs | For handling hot potatoes |
| Parmesan (optional) | 2 tablespoons, grated | — | — |
Step-by-Step Process of Crispy Smashed Yukon Gold Potatoes

Follow these steps carefully, and the crust will take care of itself.
Step 1: Boil the Potatoes
Salt your water generously; it should taste like the sea.
Add the Yukon Golds whole and unpeeled, and cook on a steady boil for 20-25 minutes.
You want them completely fork-tender all the way through. Underdone potatoes won’t smash cleanly and won’t crisp the way they should.
Step 2: Drain and Dry Thoroughly
Once boiled, drain the potatoes and let them sit uncovered for at least 10 minutes.
Steam is moisture, and moisture is the enemy of crispiness. Spread them out on the baking sheet while they cool.
That extra air circulation makes a real difference here.
Step 3: Preheat Your Oven
Set your oven to 425°F (220°C) and let it fully preheat before anything goes in.
A hot oven from the start is non-negotiable. Sliding potatoes into a lukewarm oven means they’ll steam rather than roast, and you’ll lose that crust entirely.
Step 4: Smash Them Flat
Place each potato on the lined baking sheet and press down firmly with a flat-bottomed glass.
Aim for about ½ inch thick, thin enough to crisp up well, but not so thin they fall apart.
Some natural cracking around the edges is exactly what you want.
Step 5: Oil and Season Generously
Brush each smashed potato with olive oil, getting into every crack and rough edge. Season with salt, pepper, garlic powder, and your fresh herbs.
If you’re adding Parmesan, hold it until the last few minutes of roasting so it melts and crisps without burning.
Step 6: Roast Until Golden
Roast for 25-30 minutes, flipping once halfway through.
By the time they’re done, the edges should be deep golden and visibly crisp. If they need another five minutes, give them that.
Pull them too early, and you’ll miss the crust you did all this work for.
Pro Tips for that Perfect Crispiness
- Choose potatoes that are similar in size so they boil and roast evenly.
- Never skip the drying step; even five extra minutes of air time makes a noticeable difference.
- Parchment paper helps, but a lightly oiled bare baking sheet gets you an even crispier bottom.
- Flipping halfway through roasting ensures both sides get equal time against the hot pan.
- A sprinkle of flaky salt right after they come out of the oven sharpens every other flavor on the plate.
- Serve them immediately; smashed potatoes are at their best straight from the oven.
Serving Suggestions
These potatoes are versatile enough to sit alongside almost anything. A few favorite ways to serve them:
As a weekend brunch side
Pair with fried eggs, crispy bacon, and a simple green salad.
The creamy centers balance beautifully against the runny yolk. It’s the kind of plate that makes a lazy Sunday morning feel worth getting up for.
With a simple dipping sauce
Garlic aioli, sour cream with chives, or a smoky chipotle mayo all work wonderfully.
Keep the sauce cool and potatoes hot. The temperature contrast makes it feel like a restaurant starter.
Alongside a Sunday roast
They stand out next to roast chicken or beef, with crispy edges and herby seasoning complementing rich, savory dishes.
They might even steal the show.
With a fresh summer salad
Serve warm with a light arugula and lemon salad. The crispy potatoes and bright greens create a perfect contrast.
It makes for a light but satisfying meal that feels put-together without much effort.
Final Thought
Crispy smashed Yukon gold potatoes are one of those recipes that look impressive but ask very little of you.
Boil, smash, roast, that’s really the whole story. The Yukon Gold does most of the heavy lifting with its naturally creamy texture and thin skin that crisps up without any fuss.
Make them for a weeknight dinner, a spread, or next time you need a side dish that earns genuine compliments.
Try the recipe, put your own spin on the seasoning, and let me know how yours turn out.
Frequently Asked Questions (FAQ’s)
1. Why are My Smashed Potatoes Not Crispy?
Excess moisture is likely the culprit; always dry them thoroughly before roasting.
2. Do You Have to Boil Potatoes Before Smashing Them?
Yes, boiling until fork-tender is essential for a clean, even smash.
3. What’s the Secret to Perfect Smashed Potatoes?
Fully dried potatoes, generous oil, and a properly preheated high-temperature oven.